Code
import newton
import numpy as np
newton.optimize(start, fun)   ## Assuming your function is called `optimize`.
newton.optimize(2.5, np.cos) ## Minimizing cos(x) from close-ish to one minimum.This module presents the core content of the workshop on version control (using Git), code style, documentation, and testing.
We’ll use a running example, Newton’s method for optimization, during this workshop. It’s simple enough to be straightforward to code but can involve various modifications, extensions, etc. to be a rich enough example that we can use it to demonstrate various topics and tools.
Recall that Newton’s method works as follows to optimize some objective function, \(f(x)\), as a function of univariate or multivariate \(x\), where \(f(x)\) is univariate.
Newton’s method is iterative. If we are at step \(t-1\), the next value (when minimizing a function) is:
\[ x_t = x_{t-1} - f^{\prime}(x_{t-1}) / f^{\prime\prime}(x_{t-1}) \]
Here are the steps:
You can derive it by finding the root of the gradient function using a Taylor series approximation to the gradient.
Here’s what you’ll need your code to do:
Don’t make your finite difference (“epsilon”) too small or you’ll actually get inaccurate estimates. (We’ll discuss why when we talk a bit out numerical issues in computing later.)
For now, please do not use any Python packages that provide finite difference-based derivatives (we’ll do that later, and it’s helpful to have more code available for the work we’ll do today).
You’re welcome to develop your code in a Notebook or in the DataHub editor or in a separate editor on your laptop.
Once you’ve written your Python functions, put your code into a simple text file, called newton.py. In doing so you’ve created a Python module.
Don’t use a Jupyter notebook (.ipynb) file at this stage, as it won’t work as a module and is not handled in git in the same nice manner as simple text files.
Once you have your module, you can use it like this:
import newton
import numpy as np
newton.optimize(start, fun) ## Assuming your function is called `optimize`.
newton.optimize(2.5, np.cos) ## Minimizing cos(x) from close-ish to one minimum.A module is a collection of related code in a file with the extension .py. The code can include functions, classes, and variables, as well as runnable code. To access the objects in the module, you need to import the module.
Go to github.com/<your_username> and click on the Repositories tag. Then click on the New button.
newton-practice (so others who are working with you can find it easily)Python under Add .gitignore.It’s also possible to create the repository from the terminal on your machine and then link it to your GitHub account, but that’s a couple extra steps we won’t go into here at the moment.
Authenticating with GitHub can be a bit tricky, particularly when using DataHub (i.e., JupyterHub).
Please follow these instructions.
In the terminal, let’s make a small change to the README, register the change with Git (this is called a commit), and push the changes upstream to GitHub (which has the remote copy of the repository).
First make a local copy of the repository from the remote on GitHub. It’s best do this outside of the compute-skills-2024 directory; otherwise you’ll have a repository nested within a repository.
cd  # Avoid cloning into the `compute-skills-2024` repository.
git clone https://github.com/<your_username>/newton-practice
If we run this:
cd newton-practice
ls -l .git
cat .git/config
we should see a bunch of output (truncated here) indicating that newton-practice is a Git repository, and that in this case the local repository is linked to a remote repository (the repository we created on GitHub):
total 40
-rw-r--r-- 1 jovyan jovyan  264 Aug  2 15:04 config
-rw-r--r-- 1 jovyan jovyan   73 Aug  2 15:04 description
-rw-r--r-- 1 jovyan jovyan   21 Aug  2 15:04 HEAD
-rw-r--r--   1 paciorek scfstaff   16 Jul 24 14:48 COMMIT_EDITMSG
-rw-r--r--   1 paciorek scfstaff  656 Jul 23 18:20 config
<snip>

<snip>
[remote "origin"]
        url = https://github.com/paciorek/newton-practice
        fetch = +refs/heads/*:refs/remotes/origin/*
<snip>
Step 2. Add files
Next move (or copy) your Python module into the repository directory. For the demo, I’ll use a version of the Newton code that I wrote that has some bugs in it (for later debugging). The file is not in the repository.
cd ~/newton-practice
cp ../compute-skills-2024/units/newton-buggy.py newton.py
## Tell git to track the file
git add newton.py
The key thing is to copy the code file into the directory of the new repository.
Step 3. Edit file(s)
Edit the README file to indicate that the repository has a basic implementation of Newton’s method. (In DataHub, you can double-click on the README in the file manager pane.)
git status
## Tell git to keep track of the changes to the file.
git add README.md
git status
## Register the changes with Git.
git commit -m"Add basic implementation of Newton's method."
git status
## Synchronize the changes with the remote.
git pushWe could have cloned the (public) repository without the gh_scoped_creds credentials stuff earlier, but if we tried to push to it, we would have been faced with GitHub asking for our password, which would have required us to create a GitHub authentication token that we would paste in.
Instead of having to add files that already part of the repository (such as README.md) we could do:
git commit -a -m"Update README."We do need to explicitly add any new files (e.g., newton.py) that are not yet registered with git via git add.
You can also edit and add files directly to your GitHub repository in a browser window. This is a good backup if you run into problems making commits from DataHub or your laptop.
Some tips:
-m flag to git commit.If you find your commit message is covering multiple topics, it probably means you should have made multiple (“atomic”) commits.
Add your new code to your repository. Then commit and push to GitHub.
Go to your partner’s repository at https://github.com/<user_name>/newton-practice.
Issues button and click on New issue).In response to your partner’s comments, make some small change(s) to your newton.py code.
You can do this in DataHub (or locally on your laptop if that’s what you’re doing) and make a commit as we did in the previous exercise.
Or you can do the editing in your GitHub browser window by clicking on the file and choosing the pencil icon (far right) to edit it. When you save it, a commit will be made. Make sure to provide a commit message. You can also create new files via the + button in the top of the left sidebar. If you make changes directly on GitHub, you’ll also want to run git pull to pull down the changes to your local repository on DataHub or your laptop.
So far we’ve just introduced Git by its mechanics/syntax. This is ok (albeit not ideal) for basic one-person operation, but to really use Git effectively you need to understand conceptually how it works.
More generally if you understand things conceptually, then looking up the syntax of a command or the mechanics of how to do something will be straightforward.
We’ll start with some visuals and then go back to some Git terminology and to the structure of a repository.
Fernando’s Statistics 159/259 materials have a nice visualization (online version, PDF version) of a basic Git workflow that we’ll walk through.
Note that we haven’t actually seen in practice some of what is shown in the visual: tags, branches, and merging, but we’ll be using those ideas later.
Fernando’s lecture materials from Statistics 159/259 illustrate that the steps shown in the visualization correspond exactly to what ppens when running the Git commands from the command line.
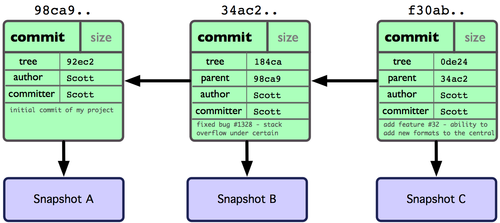
A commit is a snapshot of our work at a point in time. So far in our own repository, we’ve been working with a linear sequence of snapshots, but the visualization showed that we can actually have a directed acyclic graph (DAG) of snapshots once we have branches.
Each commit has:
diff tool) relative to the parent commit.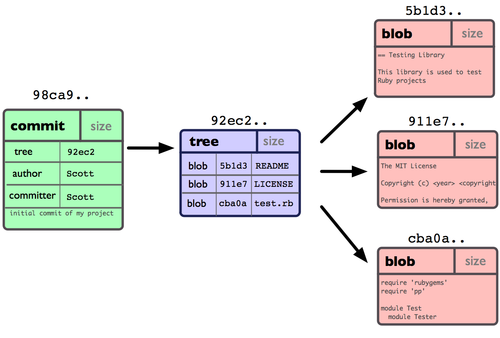
We identify each node (commit) with a hash, a fingerprint of the content of each commit and its parent. It is important the fact that the hash include information of the parent node, since this allow us to keep the check the structural consistency of the DAG.
We can illustrate what Git is doing easily in Python.
Let’s create a first hash:
from hashlib import sha1

# Our first commit
data1 = b'This is the start of my paper.'
meta1 = b'date: 1/1/17'
hash1 = sha1(data1 + meta1).hexdigest( )
print('Hash:', hash1)
Hash: 3b32905baabd5ff22b3832c892078f78f5e5bd3b Every small change we make on the previous text with result in a full change of the associated hash code. Notice also how in the next hash we have included the information of the parent node.
data2 = b'Some more text in my paper...'
meta2 = b'date: 1/2/1'
# Note we add the parent hash here!
hash2 = sha1(data2 + meta2 + hash1.encode()).hexdigest()
print('Hash:', hash2)
Hash: 1c12d2aad51d5fc33e5b83a03b8787dfadde92a4A repository is the set of files for a project with their history. It’s a collection of commits in the form of an directed acyclic graph.
Some other terms:
The index (staging area) keeps track of changes (made to tracked files) that are added, but that are not yet committed.

If I make some changes to a file that I decide are a mistaken, before git add (i.e., before registering/staging the changes with git), I can always still edit the file to undo the mistakes.
But I can also go back to the version stored by Git.
# git checkout -- file.txt  # This is older syntax.
git restore file.txt
If we’ve added (staged) files via git add but have not yet committed them, the files are in the index (staging area). We can get those changes out of the staging area like this:
git status
# git reset HEAD file.txt  # This is older syntax.
git restore --staged file.txt
git status
Note that the changes still exist in file.txt but they’re no longer registered/staged with Git.
Suppose you need to add or modify to your commit. This illustrates a few things you might do to update your commit.
git commit -m 'Initial commit'
git add forgotten_file.txt
# Edit file.txt.
git add file.txt
# Get version of file from previous commit.
git checkout <commit_hash> file.txt
git commit --amend
git revert <commit_hash>
git pushNote that this creates a new commit that undoes the changes you don’t want. So the undoing shows up in the history. This is the safest option.
If you’re sure no one else has pulled your changes from the remote:
git reset <commit_hash>
# Make changes
git commit -a -m'Rework the mistake.'
git push -f origin <branch_name>
This will remove the previous commit at the remote (GitHub in our case).
Having a (reasonably) consistent and clean style, plus documentation, is important for being able to read and maintain your code.
A: You, but at some point in the future by which you will have forgotten what the code does and why.
I can’t tell you how many times I’ve looked back at my own code and been amazed at how little I remember and frustrated with the former self who wrote it.
A go-to reference on Python code style is the PEP8 style guide. That said, it’s extensive, quite detailed, and hard to absorb quickly.
Here are a few key suggestions:
Indentation:
Whitespace: use it in a variety of places. Some places where it is good to have it are
x = x * 3;myfun(x, 3, data);x = [3, 5, 7]; andx[3, :4].Use blank lines to separate blocks of code with comments to say what the block does.
Use whitespaces or parentheses for clarity even if not needed for order of operations. For example, a/y*x will work but is not easy to read and you can easily induce a bug if you forget the order of ops. Instead, use a/y * x or (a/y) * x.
Avoid code lines longer than 79 characters and comment/docstring lines longer than 72 characters.
Comments:
x = x + 1 # Increment x..x = x + 1 # Compensate for image border.You can use parentheses to group operations such that they can be split up into lines and easily commented, e.g.,
newdf = (
        pd.read_csv('file.csv')                   # 1988 census data.
        .rename(columns = {'STATE': 'us_state'})  # Adjust column names.
        .dropna()                                 # Remove rows with missing values.
        )
Being consistent about the naming style for objects and functions is hard, but try to be consistent. PEP8 suggests:
number_of_its or n_its.Try to have the names be informative without being overly long.
Don’t overwrite names of objects/functions that already exist in the language. E.g., don’t use len in Python. That said, the namespace system helps with the unavoidable cases where there are name conflicts.
Use active names for functions (e.g., calc_loglik, calc_log_lik rather than loglik or loglik_calc). Functions are akin to verbs.
Learn from others’ code
Linting is the process of applying a tool to your code to enforce style.
We’ll demo using ruff to some example code. You might also consider black.
We’ll practice with ruff with a small module we’ll use next also for debugging.
First, we check for and fix syntax errors.
ruff check newton.pyThen we ask ruff to reformat to conform to standard style.
cp newton.py newton-save.py   # So we can see what `ruff did.
ruff format newton.py
Let’s see what changed:
diff newton-save.py newton.pyhelp(numpy.linalg.cholesky) to see the different parts and the format.ruff to your code.Once you start writing more complicated code, even in an interpreted language such as Python that you can run line-by-line, you’ll want to use a debugger, particularly when you have nested function calls.
Debugging can be a slow process, so you typically start a debugging session by deciding which line in your code you would like to start tracing the behavior from, and you place a breakpoint. Then you can have the debugger run the program up to that point and stop at it, allowing you to:
The stack is the series of nested function calls. When an error occurs, Python will print the stack trace showing the sequence of calls leading to the error. This can be helpful and distracting/confusing.
We’ll use the debugger in JupyterLab; similar functionality is in VS Code. And you can use pdb directly from the command line; the ideas are all the same.
Let’s debug my buggy implementation of Newton’s method.
import newton
import numpy as np
newton.optimize(2.95, np.cos)
Clearly that doesn’t work. Let’s debug it.
We’ll work in our Jupyter notebook.
If we want to debug into functions defined in files, we can add breakpoint() in the location in the file where we want the breakpoint and one should see the code in the SOURCE box in the debugger panel. So far, I’ve found this to be a bit hard to use, but that may well just be my inexperience with the JupyterLab debugger.
Note that the value of x_new doesn’t show up automatically in the variables pane. This is probably because it is a numpy variable rather than a regular Python variable.
ipdb)We can use the IPython %debug “magic” to activate a debugger as well.
One way this is particularly useful is “post-mortem” debugging, i.e., debugging when exceptions (errors) have occurred. We just invoke %debug and then (re)run the code that is failing. The ipdb debugger will be invoked when the error occurs.
Once in the ipdb debugger, we can use these commands (most of which correspond to icons we used to control the JupyterLab debugger behavior):
c to continue execution (until the end or the next breakpoint)n to run the next line of codeu and d to step up and down through the stack of function callsp expr to print the result of the expr codeq to quit the debuggerWe’ll put a silly error into the code, restart the kernel, and use the post-mortem debugging approach as an illustration.
Run your Newton method on the following function, \(x^4/4 - x^3 -x\), for various starting values. Sometimes it should fail.
Use the debugger to try to see what goes wrong. (For our purposes here, do this using the debugger; don’t figure it out from first principles mathematically or graphically.)
Conditional breakpoints are a useful tool that causes the debugger to stop at a breakpoint only if some condition is true (e.g., if some extreme value is reached in the Newton iterations). I don’t see that it’s possible to do this with the JupyterLab debugger, but with the ipdb debugger you can do things like this to debug a particular line of a particular file if a condition (here x==5) is met:
b path/to/script.py:999, x==5pytestpytest is a very popular package/framework for testing.
We create test functions that check for the expected result.
We use assert statements. These are ways of generally setting up sanity checks in your code. They are usually used in development, or perhaps data analysis workflows, rather than production code. They are a core part of setting up tests such as here with pytest.
pytest test_newton.pyWith a partner, brainstorm some test cases for your implementation of Newton’s method in terms of the user’s function and input values a user might provide.
In addition to cases where it should succeed, you’ll want to consider cases where Newton’s method fails and test whether the user gets an informative result. Of course as a starting point, the case we used for the debugging exercise is a good one for a failing case.
We’ll collect some possible tests once each group has had a chance to brainstorm.
Implement your test cases as unit tests using the pytest package.
Include tests for:
with the expected output being what you want to happen, not necessarily what your function does.
You’ll want cases where you know the correct answer. Start simple.
For now don’t modify your code even if you start to suspect how it might fail. Writing the tests and then modifying code so they pass is an example of test-driven development.
To understand how Python handles error, you can take a look at the Errors and Exceptions section of the Software Carpentry workshop. The primary ideas covered are understanding error messages and tracebacks.
Now we’ll try to go beyond simply returning a failed result and see if we can trap problems early on and write more robust code.
Work on the following improvements:
Your code should handle errors using exceptions, as discussed earlier for Python itself. We don’t have time to go fully into how Python handles the wide variety of exceptions. But here are a few basic things you can do to raise an exception (i.e., to report an error and stop execution):
if not callable(f):
   raise TypeError(f"Argument is not a function, it is of type {type(f)}")
if x > 1e7:
raise RuntimeError(f"At iteration {iter}, optimization appears to be diverging")import warnings
if x > 3:
warnings.warn(f"{x} is greater than 3.", UserWarning)Next, if you have time, consider robustifying your code if you have time:
Once you are working on more complicated projects and particularly when working with multiple people, you’ll want to be able to use branches and pull requests (PRs) to manage the work.
Before going further, let’s review our visualization of working with Git (online version, PDF version)
We’ll demo the use of branching and PRs by fixing our optimize function.
First, let’s fix the error in our function in a new branch.
git switch -c fix_initial_bugsWe’ll now make the fixes and do the linting (not shown).
Push the branch with the fix to GitHub.
git add newton.py
git commit -m'Fix initial bugs:
- derivative interval too small
- stopping criterion logic incorrect
- copy-paste duplication'
git push -u origin fix_initial_bugsNow we’ll go to GitHub and start a pull request (PR).
Since we’re the ones who control the repo, we’ll also review and merge in the PR.
Next let’s see a basic example of a merge conflict, which occurs when two commits modify (which could include deletion) the same line in a file. In this case Git requires the user to figure out what should be done.
To get an example, we need to create a conflict. I will add different documentation in the main and fix_initial_bugs branches. After pushing the main change, I’ll try to do a PR with the fix_initial_bugs.
The GitHub UI does a nice job of helping you resolve merge conflicts, as we’ll see.
You can also get (and resolve) merge conflicts on the command line. Git will add some syntax to the conflicted file pointing out the conflicts that need to be resolved. Once you edit the conflicted file to fix the conflict, you can do git add <name_of_file> and then git commit.
Recall that Newton’s method optimizes some objective function, \(f(x)\) as a function of univariate or multivariate \(x\), where \(f(x)\) is univariate.
The multivariate method extends the univariate, using the gradient (first derivative) vector and Hessian (second derivative) matrix.
If we are at step \(t-1\), the next value is:
\[ x_{t+1}=x_{t}-H_{f}(x_{t})^{-1}\nabla f(x_{t}) \]
where \(\nabla f(x_{t})\) is the gradient (first derivative with respect to each element of \(x\)) and \(H_{f}(x_{t})\) is the Hessian matrix (second derivatives with respect to all pairs of the elements of \(x\)).
Here are the steps:
main branch. And make sure you push the changes to GitHub.multivariate) in which you’ll implement the multivariate version of Newton’s method (see details above)newton.py or in a new file if you prefer.You may need to search online for how to calculate \(H_{f}(x_{t})^{-1}\nabla f(x_{t})\).
At this point, if we think about calculating the Hessian it starts to feel more tedious to deal with the finite difference calculations, though it is a straightforward extension of what you already implemented. Feel free to look online to find a Python package that implements finite difference estimation of derivatives and use that in your code (see what Google indicates or if you use a ChatBot/LLM what they suggest).
As you are writing the code, you can continue to think about what might go wrong and include defensive programming tactics.
When you have your branch ready, make a pull request:
Make a pull request into the remote for the repository by pushing the branch to GitHub
git push -u origin multivariateGo to GitHub to the Pull requests tab and make the PR, making a note of what the PR is about.
Don’t (yet) merge in the PR. We want someone else to review it to have additional eyes on the code.
Now find a partner.
Give the partner the URL for your repository on GitHub and ask them to look at the PR. In turn get the URL for their repository.
In reviewing the PR, make comments in the PR comment/conversation area on GitHub.
If you have time, explore these two additional options for making comments:
Files changed tab (or go to https://github.com/<USERNAME>/newton-practice/pull/<PULL_ID>/files for the specific “PULL_ID”).Review changes button.Files changed tab (or go to https://github.com/<USERNAME>/newton-practice/pull/<PULL_ID>/files for the specific “PULL_ID”).Add single comment or optionally experiment with Start a review.Once you’ve seen the review by your partner:
git pull to get the changes updated in the main branch of your local repository.Congratulations. In the course of the day, you’ve worked through the steps of a complete, albeit small, project using an extensive set of concepts, skills, and tools used in real world projects.